Wednesday, 7 January 2015

Crafting on a Budget - A New Series - Sentiment Cards

Hello and welcome back  to the 365 blog - with all festive supplies stashed away again for another 11 months, I have turned my thoughts back to these monthly regular posts.
I (Claire N) have decided to run my next 12 monthly posts (on the 7th of each month) with a theme, so I hope you enjoy and follow along.

The main theme I'll be working to, is crafting on a budget. I think there will be something for everyone, maybe you have decided the New Year is the time to start crafting, or you have decided (as a crafter) that this year you will be more economical with your supplies and are determined to use all your scraps before buying new paper pads.

                                                                            ******

All the cards made share the fact that the main focal image is actually the sentiment, stamped onto the labels that can be downloaded from Sarah's website.


So, to begin, I have made a set of cards, using 
  • Simple card blanks - a pack of 50 card blanks & envelopes can be bought for about £6.50 (13p per card & envelope). You may be able to find smaller packs that cost less!
  • Free download papers - Sarah has a couple of sets of free download papers
  • Paper scraps & offcuts - Crafters  will have endless boxes, but as a beginner, save packaging/labels etc, if a pattern strikes you and the paper/card is in a fairly good condition keep it! If you buy from Sarah's shop, sometimes the packaging includes some lovely teal blue tissue paper. ideal to add to cards. But if you don't have any, you can download some printable papers from Sarah's shop.
  • Small embellishments & ribbon -
     again seasoned crafter will have plenty. But as a beginner, use buttons laying around your home, salvage sparkly/pretty embellishments from other greetings cards. How about looking at your clothes, have any of your jumpers got lengths of ribbon in the shoulders that get in the way? - snip it out and use on your cards (I do it all the time!)  Alternatively Sarah has grab bags of embellishments in her shop ranging from £3.50 to £5. The cards pictured show a representation of the some of the embellishments in these bags.
  • One stamp set & ink - For the beginner, a well chosen stamp set will be invaluable and something to use again and again. I have thought for you and if you can only stretch to one set, I would suggest a set of Sentiment Stamps - suitable for all occasions and people. Sarah's set here is £5.99. To keep costs down initially, I would recommend just one Memento ink pad in black, ranging in price from £1.01 to £2.74
  • Double sided tape - a good adhesive is key, and with experience you will find your own preference. But to begin I would recommend this really strong double sided tape for £2.63
  • Cutting Stationary (Sharp scissors or craft knife, steel ruler and self healing mat) - Use what ever you are comfortable with initially. 
To sum up, if you are a beginner, for an initial outlay of £20 (an additional £12.75 will get some optional extras) you will have more than enough supplies to make these 5 cards, and more.

First Card

Card is 3.75" square, backing paper is 3.5" square, red layer behind sentiment is 2"x 1.25"

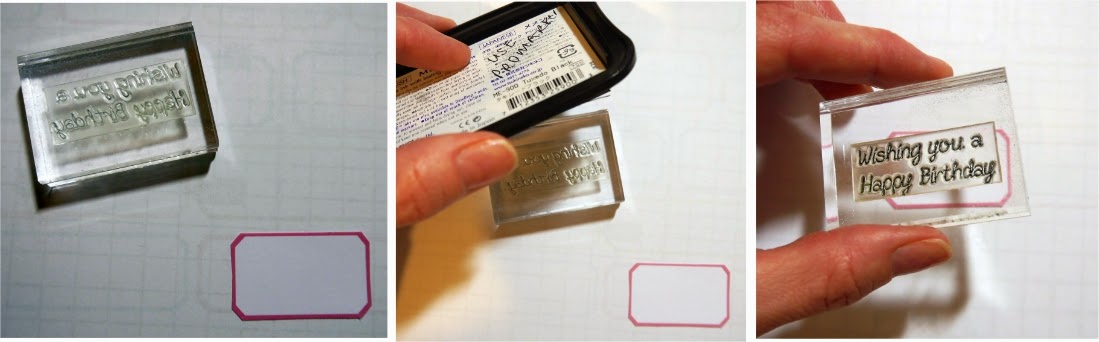
For Beginners - The sequence of events stamping your sentiment.
Peel the stamps from the plastic sheet, and put onto an acrylic block. If you don't have one use anything clear and plastic, for example a plastic ruler, the lid of a CD case etc.

For Beginners - on the reverse of each cut element line with the red double sided tape (top).
The lower photo shows the order in which the elements should be applied to the card.

Second Card

I've heard that colour blocking is fashionable in clothes, well I wouldn't know about that LOL! but it is a good look to create a card for a teenage boy.

For Beginners (card is 4.75" square)- Just wanted to show how to finish the card with a small few stamped accents, using both the stamp set and inks listed at the top of the page.
The stamp set is so versatile, and the finishing touches really 'jazzes' up your project.

Third card

Do you remember paper weaving, it is a perfect way to use up, those smaller scraps of paper and add some interest to a small card.


For Beginners - How to compile the card which is 3.75" square

Fourth Card

A very simple card, but clean and effective and lets you use 2" squares of co-ordinating paper as a backdrop to the stamped hearts and sentiment.


Fifth Card

This is a bold card with striking colours, and a bit of dimension from the 3D glittery heart. The ribbon has been recycled from one of my lightweight summer tops.


For Beginners - this card is 4.75" square, with the main pink backing paper being 4.25" square.
To keep things simple the dimensions of the other elements isn't essential, you can cut the pieces to the size that looks good for you. This craft is all about personal taste and that is what adds the uniqueness to each piece you create.

I hope that I have been able to encourage those new to this craft to give it a go. I wanted to show you do not need to spend too much on materials, to be able to create something fun and vibrant, for all number of occasions for both males and females. Making the right initial purchases is key, and if you are able to follow me through the months I will start adding in further supplies and also showing you how to get the most out of them too.

For you seasoned crafters, who have persevered to this stage in the post (thank you LOL), I hope I have given you a few ideas on how to use use up those scraps of paper, and also how going back to the basics of card making, and focusing on sentiments, can produce sweet little fun cards.

All of us with this hobby want to get the most out of the supplies we buy, and over the coming months I hope to be able to demonstrate different style of cards that can be made from one stamp set, or paper set etc. 

See you again next month, and I've introduced theme, I promise the next post won't be such marathon..hehe.

Claire N x


Supplies List


Sunday, 4 January 2015

Clare's February Calendar

I have been a huge fan of art journaling for a few years now. Seeing both Jaine and Sarah create amazing layouts, I knew I just had to try this out one day, and here we are, it is the New Year after all!

As you can see I wimped out on the messy layout for now, not because I'm afraid, ok I might be a little lol but mainly because I had this idea in my head and as much as I tried to think messy I just couldn't lol. There's always March's or Aprils calendar hee hee

*****
So anyway here's a little tutorial, just the main part though.

1 - Using a cutting knife remove a page from an old book.

2 - Stamp the girl and the scalloped border from the 'Wish Upon A Star' Doodle Doll set.

3 - Take the heart outline stamp from the 'Thinking of you'  Charm Street stamp set and stamp at          the bottom and on the girls dress.


4 - Doodle some stems to create heart flowers.


5 - Cut around the scalloped border.


6 - Using the 'Poppy' coloured Promarker, colour in all the hearts. Then using the 'Black' coloured            Promarker colour in the girls hair and shoes. The ink tends to bleed a little so be careful when              colouring around the edges.


7 - Next add some journalling. I used Tim Holtz label letters which I had in my stash.


8 - Finally add the ring mark stamp from the mini textures stamp set.


*****
Here's the finished layout


Let's go shopping in Sarah's online store!!

Mini background stamp set


Charm Street Cuties - Thinking of you stamp set


Doodle Doll - Wish Upon A Star


Calendar stamp set

Thanks for stopping by and don't forget to download your free Calendar Template here.

Clare x

Wednesday, 31 December 2014

A Year in Review!


Today it's my turn to review the year and what a massive year of change it's been again for Team Hurley but once again my wonderful team have adapted to every new challenge and consistently produced wonderful projects and inspiration for this blog and for our Lookbook, still going strong and notching up thousands of readers every month!

I thought today I would round up my favourite posts of the year - a great starting point if you're new to this blog!

Firstly, the year rounds up from Clare and Jaine have been marvellous, I've really enjoyed reading how they have changed and grown over the year, amazing work from both of them this year and they both have incredible things lined up for the new year - I can't wait to share them with you!!

Jaine's easy watercolour technique was fabulous and I just love the effect this gives (don't forget to use a Staz on ink pad so it doesn't run!!)

Both Carol and Nicole made great use of their Silhouette machines this year and shared some fabulous projects with us, these were my favourites though.

Claire and Ria made great use of stamps and embellishments in these projects.

We also welcomed Susie in December who has joined us through our month of December inspiration and I'm looking forward to seeing more of her work in the new year.

Finally, after a month of inspiration for documenting our Decembers, my girls have come up with a fabulous calendar project for the new year, you can see the start of it here and I'll be back with a free download and some more information later this week so you can play along with them all year long!

Thank you for being part of our 2014 and we look forward to bringing you even more in 2015!

Happy New Year everyone
Sarah x


Tuesday, 30 December 2014

Documented December - Day Thirty - Clare's Year In Review

When I look back at 2014 I can honestly say it's been the most exciting and hard working so far!!
You might want to grab a cuppa, this post is looooooooooong lol

It all kicked off when Sarah asked me to become part of the Special Editions Stamp range, alongside the very talented Jaine. Never in my wildest of dreams could I have predicted this new and exciting adventure.

Here's a set from my latest release.....


Another highlight was going on a trip to London to spend a few day's with Sarah and B. Of course you can't be a tourist and not do tourist stuff, so on a whim we went on a boat cruise! It was the most fun ever, proper belly laughed which may have been ignited by a pre cruise cocktail ha ha!

Love this picture and one for my Documented 365 page for sure!!!


January saw the launch of the Sarah Hurley 365 Inspiration blog, showcasing Sarah's wonderful products. Here's just a few of my projects, some documented 365 and then some of my favourites.....

Documented 365


Doodle Dolls


Documented December


Charm Street Cuties


Clare Brown - Special Editions


December saw the latest release of the Look book. I always get giddy with excitement when this comes out as we don't share our projects beforehand so it's a wonderful surprise for us all.


 2015 is looking to be even better!

January see's the launch of our calendar projects where you can download the free template and share your projects with us.

Here's mine


As for what else we have planned you will just have to wait and see! lol

So that's all from me for now.

Have a wonderful New Year!

Clare x


Sunday, 28 December 2014

Documented December - Day Twenty Eight - Jaine's Year in Review.

Wow, for me it's been a whirlwind of a year which has seen me working harder than ever on projects and designs. 

Right at the beginning of the year I vowed to take up pocket page style scrapping on a regular basis. This meant creating a page per week which was brilliant. I absolutely love it and even though I did fall behind over the summer (I'm still catching up now) I'll get it finished and start a new one for 2015 because I've totally fallen for this type of memory keeping. I found it easy to do and a whole lot less intimidating than full sized layouts. In the beginning I used a lot of Sarah's pre-cut journaling cards from the earlier monthly kits but now I cut my own from patterned paper and even make my own too with stamps and embellishments. 


Talking about stamps and pocket page scrapping, I was thrilled to see my very own stamp set come out especially for Project Life pages. These won't be one offs as I've plans for more like them next year.


I got to do lots of art journaling and messy stuff too like this one which I created as a tutorial to backgrounds.


 Backgrounds are the most important part of a journal page project for me and so it came quite naturally to design my own background stamps. These two sets got me really excited and gave me lots of ideas for other backgrounds in the future.


Creating the pocket page scrapping also led to more 12 x 12 layouts as I wanted to create at least one per month.  It's made me a lot less anxious about it and I've truly enjoyed creating them.I hope I can keep the same momentum up in 2015.


I know 2015 is going to be busier than ever but I'm ready to take it on. 
I want to wish you all a very happy New Year and what ever you do I hope it brings joy and prosperity.

Jaine x

Saturday, 27 December 2014

Christmas Bookmarks


Hello, thank you if you have joined me (Claire N) today. I am sharing with you a set of bookmarks that I made for the Sarah Hurley Xmas lookbook


If you head over to the Lookbook I have written out a full tutorial on how they were made.
The small charms are made by stamping the cute characters onto shrink plastic, and then threading them, along with small silver seed beads onto some cotton, before attaching them to the bookmark.


To make the snow background I had to think outside the box. I didn't have a snow background stamp, but on the Doodle Doll Princess Girl Stamp Set there is a sequin waste background stamp, and by repeat stamping and pattern matching that does a pretty good job.


Materials used
Crafty Impressions Christmas Crackers Stamp Set

New Year Fun

Hi All,

Nicole here with you today. You may all still be in food induced comas on the sofa watching telly and eating chocolates? If so - enjoy!! I am sharing a fun new years card today using some Sarah Hurley products.

I used the Tickets and Labels stamp set to create a background on a card base using the solid and open triangles in the set. I used two colours, peacock feathers and mustard seed. I stamped in a random pattern and in random directions.


I took some scraps of Sarah's papers and added a strip of red line tape to them and added distress glitter to this. I also die cut out the numbers for 2015 and added glossy accents on these and more distress glitter.

While all that was drying I splattered some ink onto my stamped background.

When everything was dry I stamped some stars onto the background and put it all together.

It is a fun and simple card to make and can be switched up into any colour scheme you like!