Wednesday, 3 June 2015
Teacher Gift Bag and Card Set
It's getting close to the end of the summer term for us, so I (Susie) have been thinking about teacher cards and gifts. I always like to give something handmade as a thank you and, if at least part of it can be made by the bairns, all the better!
The card is fairly simple, but has a little bit of "sewing", which my son thoroughly enjoys doing, and a cute wee Octopus from Clare's Seaside set. The matching bag is super simple and made from a single A4 sheet of paper.
Sewing panel on card
Cut a 13.5cm x 6.8cm strip of gold card.
Mount a 13.1cm x 6.4cm strip of Sarah's Dotty paper in mint onto it.
Punch holes in the left hand strip of dots. (I used the 1/8" hole punch of my Big Bite tool.)
Thread rafia through the holes as if sewing running stitch. (Rafia is a bit stiffer for threading through the holes, but thread and ribbon would also be possible.)
For a neat finish, tape the ends of the rafia on the reverse of the panel.
For a more undone finish, like we decided upon, just cut the ends in line with the edge of the card blank.
We assembled the panel, together with another strip and the cute octopus onto the card, stamped our sentiment in Rich Cocoa Memento Ink and a few shells from Clare's Seaside set and some Stardust Stickles to complete the card.
Gift Bag
Print another sheet of Sarah's Dotty paper in mint and trim off the white border.
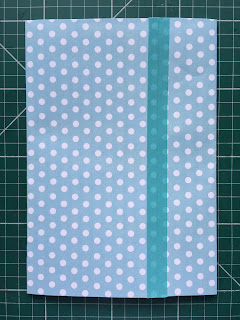
Face down, with paper landscape, fold the short sides to meet or overlap slightly and secure with washi tape.
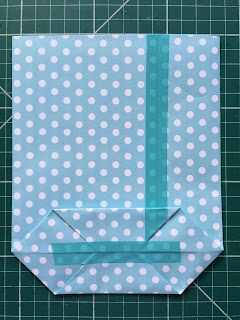
Fold bottom up approximately 5cm and crease.
Open out your fold and match fold lines to make triangles.
Fold each straight edge to the fold and secure with wash tape.
Turn and repeat the folding and triangle making with the other end.
Fold up the newly made flap and punch two holes.
Fill your gift bag before threading your rafia through the holes and tying in a bow, with a stamped octopus tag.
We might make shortbread or fudge to include in the gift bag. Or, if time escapes us, we'll buy some sweet goodies and just package them nicely in our handmade gift bag!!
Thanks for sticking with me to the end of my post. I would love to see any cards and gift bags you make as a result of this post. Leave me a comment and I'll come visit you to see!! x
Subscribe to:
Post Comments (Atom)


Love these susie, and the colours are gorgeous, and how you've threaded the twine x
ReplyDeleteWhat a cute idea. Thanks for explaining the bag fold too.
ReplyDelete