Saturday, 27 June 2015

Background stamping

Hello there! Its Ria here today.

For today's card project, I did a stamped background using the Special Edition stamp - Garden Fairy by Clare.

I also used the small flamingo stamp from Sarah Hurley. Its part of the kit from A Few of my Favourite Things kit but you can definitely use whatever stamp that you may have. 

Just the basic stamping for the background, here I started with the red.  


I kept three color ink pads to alter the colors and stamped the butterfly and flowers alternatively. I also used the swirl shape to fill some gaps in between spaces.


I later die cut a tag shaped cardstock to put  my sentiment and add some banners. 
For additional texture, I also put some sequins randomly and of course a red satin  ribbon to pop some more color.


and the finish card..


Until next time!. Have a great weekend!


Thursday, 25 June 2015

A Fairy Bug Themed Card

Good morning, it's Susie here and we are getting ready for our schools finishing up tomorrow - the summer plans are being made and the excitement is high!

I've been helping a lot in school during the last month, and one of the many activities we did was a Bug Hunt in the local woods and that inspired me to make this card.

I started with two hexagons from the Zendoodle Borders & Bits Stamp Set, stamped in Wheat ink.  The ladybird, from Clare's Woodland Fairy set and the snail from Clare's Flower Fairy set, were stamped in black ink and coloured with my pencils.  The butterfly is from Clare's Garden Fairy set.

The bold stripy card was from one of Sarah's A Few of my Favourite Things kits and matted onto some red paper as a colourful contrast.  Just a little bit of Platinum Stickles completed my clean and simple (and easily mail-able!) card.

These cute insects, together with the other items in the sets, would be wonderful for a scrap layout of a woodland walk.......mmmmm, maybe I have my next project sorted!!

Tuesday, 23 June 2015

JUNE CALENDAR BY CLARE

Hello how are you? 

Today I'm (Clare) sharing with you my calendar project for June which I have focused around Fathers Day. My pages are normally quite bright and colourful but I think the gloomy weather we have been having recently has played a part in my colour choice. So if anyone has seen summer can you send it my direction! lol.


Here are some close up shots


Below are quick and simple step by step instructions.

1 - Cut a piece of white card measuring 18cm x 14cm.

2 - Distress the whole page using tumbled glass distress inks and a blending tool.

3 - Stencil a brick background (Tim Holtz) using weathered wood distress inks and a stencil dauber.

4 - Stamp twice, Sid the Robot from my Special Editions stamp set with Tuxedo black Memento ink and a clear acrylic stamp block. 

5 - Colour both images using alcohol markers. You only need to colour the centre of the second image. Here I used a selection of cool greys from Shinhan.

6 - Cut out both coloured images.

7 - Add foam pads to the back of both pieces to create dimension. (stix2)

8 - Die cut a 'Hello' sentiment and some circles from a tag die ( Sizzix) and glue in place.

9 - Add words and letters again adding foam pads to the back for dimension.

10 - Finally add a lightening flash embellishment. This one came in an earlier Few Of My Favourites Things monthly kit by Sarah. You can subscribe here!


Products used


I hope you have enjoyed my post today as well as discovering the many other posts by the aamzing design team.

If you missed my last post you can find it here.

Take Care

Clare x

Saturday, 20 June 2015

July Calendar page by Jaine

It's that time again, with Summer well and truly here, for school to finish. Well, almost anyway.

I keep hearing "School's out for summer" in my head!


Of course I'm a month ahead with my calendar as usual but it'll creep up before I know it. We're already making plans for trips, visits and holidays.


This time I've gone for a more scrapbooky (is that a word?) feel for July using some of the journaling cards and washi tape from the latest A Few Of My Favourite Things kit and layered them onto my background which I've painted and randomly stamped with a couple of my background stamps, Fireworks and Pebbles.  I've also used the 'Yay' from the Everyday Sayings stamp set.


I hope you're keeping up with us here.

What are you planning for summer?

Jaine x

Wednesday, 17 June 2015

July Calendar page


Hi there!

It is that time again for me (Claire N) to share the next page of the calendar that I, Jaine and Clare are all creating this year.
In December we will all collate our pages and each blog our entire calendar, and it will be so intriguing to see how different all three will look.


Today I have created my page for July. I have used the new papers from Sarah's re launch of her 'A Few of My Favourite Things' kit. I'm so pleased Sarah has decided to bring these kits back because firstly, I was running out of paper, and mainly because they are such beautiful quality, and I really do love the colour palettes that Sarah chooses. To definitely secure a kit you can subscribe to a delivery of a wonderful box of goodies every two months, or otherwise pop into the shop to see if there are a few kits available to buy on a single basis.

 To find out more you can follow this link


So onto my page, I decided to layer some of the new papers together, the colours of which remind me of ice-cream. I also chose a selection of stamps that reminded me of summer and holidays, and fitted into the ice-cream scheme. I stamped the images onto papers from the kit also so they co-ordinated perfectly.


Thank you very much for joining us today, I'm certainly in the mood for summer now and hope you are too.
See you again soon.

Supplies used

A Few of My Favourite Things Monthly Scrapbooking Kit contains scrapbooking paper, journaling cards, cardstock and a stamp
'A Few of my Favourite Things' May kit
Expedition stamp set
Doodle Home Stamps

Odds & Ends Stamp Set
Small square acrylic stamping block
3-in-1 craft glue

Saturday, 13 June 2015

Hello card

Hello there!

Its Ria here today!

In today's card, I used the mini stamps that I got from Sarah's kit previously. I specially love the small shapes that one can easily use to create patterns which I did here on the side of the card.

I stamped the shapes randomly to fill one area of the card base. I then added a stitched accent by using a die cut shape with only stitching lines.
You can also do a different variant of the mini stamping by using different colors of ink in white cardstock, that would also look great.

My 'Hello' sentiment is from one of Sarah's Snip n Stick embellishment sheet while the papers are a from random ones from Sarah's scrapbooking kits.


I added some die cut stars and sequins to add texture on my card.

And this is the full card..


Until next time!

Thursday, 11 June 2015

Journey of the Flamingos

Hi All,

It is Nicole here today to share a project with you. I had so much fun on this one, getting my hands totally covered in ink, the best kind of crafting in my opinion!

I started off by taking salty ocean distress ink and pressing the pad down onto my work surface - I work on a glass mat. You would need to work on a non stick mat or other non porous surface for this. I sprayed this ink with water and then swiped a panel of watercolour card through it.
 I got this fabulous effect, which I let dry fully....
 I then repeated this process with peacock feathers distress ink to get a wonderful two toned effect.
 I cut my panel down into a banner shape.
 I then had fun with the Sarah Hurley Curio stamp set. I used the peacock feathers distress ink to do some almost tone on tone stamping of some of the elements in the set. I spaced them all around the globe in the center. The Enjoy the Journey is the main sentiment so I double stamped that to make it stand out more.
 On the globe I used a wink of stella pen to add some shimmer to the stand and the land masses. This pen gives wonderful shimmer, but is also very difficult to photograph!
 I added this onto the card base, which I made from some of Sarah Hurley's papers.

 I then used the Sarah Hurley Flamingo Couple cut file from the Silhouette store and cut one flamingo.
You can see it here being assembled....he is still missing his legs!
Once fully assembled I adhered the flamingo onto the card. I placed him so that it looked like he was standing on the globe! I left the card at that as I really wanted the banner and bird to stand out so I resisted the urge to add more on!
I hope you liked this little make. I am calling it a clean and simple card, but I am not quite sure it qualifies! Thanks for stopping by today :)

Tuesday, 9 June 2015

All at sea.


I thought today I'd show you a quick card made using two of my stamp sets, Beside the Seaside and Don't be Crabby.

When I was young, my parents nearly always took their holiday at the same place in North Wales, which as a child, I found very tedious and longed to go on exciting holidays like I thought a lot of my friends did. It's funny though how you see things and now looking back on those times it wasn't boring at all. In fact I remember lots of fun times there.

These memories sparked the ideas to design these two stamp sets and it seemed rather appropriate to create this card to send to my Dad for his birthday coming up so he can remember  the good times we had.

The background is a simple watercolour wash and each element was fussy cut out and stuck down on top. It seems a fiddly thing to do but with a small pair of sharp scissors it's not too difficult.


I hope it brings back some memories for you too.

Jaine x

Sunday, 7 June 2015

Pom Pom Pets,Crafting with Kids

Hi There!
I've been looking forward to sharing with you today this little Pom Pom pet, going by the name of 'Mr Lovebird' in Sarah's shop, and 'Fluffy' in our home. Sarah's has a range of these Pom Pom Pets as part of her 'World of Imagination' Range of products, 

'where the sky is sky blue pink, the grass is glittery green and gum drops grow among the flowers. In your World of Imagination you can be anything you want to be, just grab your ticket and get ready for a trip to the fantastical world of make believe!'


Continuing on with the theme that saw us celebrate International Children's Day on 1st June, I (Claire N) thought it was an ideal time to show you that these kits are perfect for you and your little ones to craft along with together.
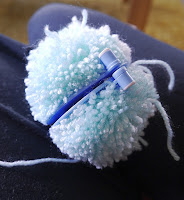
This was very much a joint project, and you can see from the photo's that my youngest (age 7) had a good go at getting this Pom Pom pet started.


I'm sure some of you will be familiar with the fact that the attention span of the youngsters can wane a little, and this is where, as a parent you can step in to offer a helping hand and speed the project along a bit.
I remember making pom-poms at this age too (though to be honest I cannot for the life of me remember why! I think I just made them because I could). These kits of Sarah's offer a much more sophisticated method of making, by supplying (in the kit) a plastic ring, to wind the wool round. I used to use roughly cut cardboard rings made from cereal boxes, did you?


Full instructions are provided in each kit, and once you get going it all comes flooding back. So, for that reason I haven't provided any instructions. I did want to offer you these photos though at key stages in the making process, to act as reminders or prompts along the way as points of reference (especially the newbies to pom-pom making).

The photo below on the left is how the pom poms looks, just as they are made, because you see from the finished photo (very top, and with Stephen below on the right) that it looks much 'neater'. The last job (before gluing on eyes, feet etc) is to give your Pom Pom pet a 'hair cut'. It is much easier to use the sharpest pair of scissors you own and trim the long rogue wool strand initially, before moving on the clipping very tiny amounts all over to even up the shape. It is very easy  to get very enthusiastic, and take too much off - so remember, 'less is definitely best' in this instance.


 I have a 13 (nearly 14) year old son also, and he was intrigued with the process of making this little cutie, and you wouldn't believe how tricky it was to get this little fluffy fella back to photograph for you to see...LOL!

If you have the opportunity to craft with youngsters I would urge you to take it, it is so much fun, and the look on their faces when they have achieved their goal is worth every minute.

Thank you so much for joining me today, I look forward to sharing my next project with you x


Friday, 5 June 2015

Super Hero Dad

Hello how are you?

This week we are celebrating International Children's Day and we will soon be celebrating Fathers Day, so in today's post I thought I'd ( Clare ) cover the two!

It's a quick and easy craft that can be done from age 1 to 101+ lol. 

To create this project all you need to do is print out your poem, some stamps and various colours of ink. I found a tub of 30 for about £10 at Hobbycraft, I thought they were good value and perfect for wee hands.


STEP 1

Print out this poem

FATHERS DAY POEM

I found this one on Pinterest but you could find or make your own poem.

STEP 2

Stamp around the page using these stamps sets.


INKS


TOP TIP!

Try using two colours when stamping the arrow


You could perhaps laminate or frame this poem for that extra special touch.

I hope you have enjoyed today's and be sure to pop by soon for more inspiration from the me, Lewis and the design team.

Clare x


Wednesday, 3 June 2015

Teacher Gift Bag and Card Set


It's getting close to the end of the summer term for us, so I (Susie) have been thinking about teacher cards and gifts.  I always like to give something handmade as a thank you and, if at least part of it can be made by the bairns, all the better!

The card is fairly simple, but has a little bit of "sewing", which my son thoroughly enjoys doing, and a cute wee Octopus from Clare's Seaside set.  The matching bag is super simple and made from a single A4 sheet of paper.

Sewing panel on card

Cut a 13.5cm x 6.8cm strip of gold card.
Mount a 13.1cm x 6.4cm strip of Sarah's Dotty paper in mint onto it.
Punch holes in the left hand strip of dots.  (I used the 1/8" hole punch of my Big Bite tool.)
Thread rafia through the holes as if sewing running stitch.  (Rafia is a bit stiffer for threading through the holes, but thread and ribbon would also be possible.)
For a neat finish, tape the ends of the rafia on the reverse of the panel.
For a more undone finish, like we decided upon, just cut the ends in line with the edge of the card blank.


We assembled the panel, together with another strip and the cute octopus onto the card, stamped our sentiment in Rich Cocoa Memento Ink and a few shells from Clare's Seaside set and some Stardust Stickles to complete the card.

Gift Bag

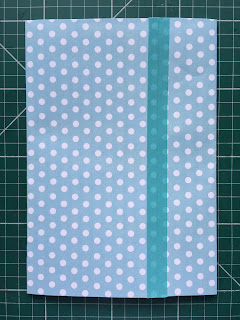
Print another sheet of Sarah's Dotty paper in mint and trim off the white border.
Face down, with paper landscape, fold the short sides to meet or overlap slightly and secure with washi tape.
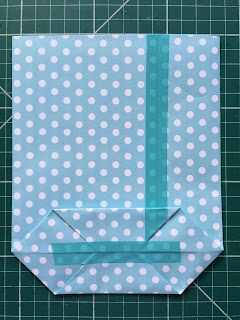
 Fold bottom up approximately 5cm and crease.
Open out your fold and match fold lines to make triangles.
Fold each straight edge to the fold and secure with wash tape.
Turn and repeat the folding and triangle making with the other end.
 Fold up the newly made flap and punch two holes.
Fill your gift bag before threading your rafia through the holes and tying in a bow, with a stamped octopus tag.
We might make shortbread or fudge to include in the gift bag.  Or, if time escapes us, we'll buy some sweet goodies and just package them nicely in our handmade gift bag!!

Thanks for sticking with me to the end of my post.  I would love to see any cards and gift bags you make as a result of this post.  Leave me a comment and I'll come visit you to see!! x