Wednesday, 29 October 2014

Concertina card

Hi and welcome to the Sarah Hurley 365 blog.

After seeing a concertina card in a recent craft magazine I really wanted to give it a try. Also I thought it would be the perfect way to showcase 4 of Sarah's Doodle Doll stamp sets. Each panel is dedicated to one stamp set, however as I have shown you in the past you can mix and match. I think their versatility is one of the reason I love them so much and in terms of value for money well it's in abundance!

Here's a little insight how it was made.

* To make the basic concertina card all you need are 3 card blanks which you stick together using double sided tape. So you don't have to worry about fussy measuring or cutting. I choose square but you could use any style or size and it would work just aswell.

*To create  the backgrounds all you need is one Tim Holtz distress ink pad and an ink tool. I deliberately only inked the centre creating a frame.

* To add more detail to the background several stamps were stamped directly onto the card.

* The sentiments were stampsed onto white card then cut out. Foam pads were added to give some depth.

* The dolls were stamped, coloured using promarkers then cut out. To give some depth I again added foam pads.

Here's some pictures showing you all sides.....


Here's a little insight how it was made.

* To make the basic concertina card all you need are 3 card blanks which you stick together using double sided tape. So you don't have to worry about fussy measuring or cutting. I choose square but you could use any style or size and it would work just aswell.

*To create  the backgrounds all you need is one Tim Holtz distress ink pad but I choose two colours  and an ink tool. I deliberately only inked the centre to create a frame.

* To add more detail to the background several stamps were stamped directly onto the card.

* The sentiments were stamped onto white card then cut out. Foam pads were added to give some depth.

* The dolls were stamped, coloured using Promarkers then cut out. To give some depth I again added foam pads.

  Here's a list of Sarah's Doodle Doll stamps that I used.


Hope you have enjoyed today's inspiration and be sure to come by soon to see more inspiration from the rest of the design team.

Clare x

Tuesday, 28 October 2014

CHALLENGE WINNERS - 97

Tonight I'm (Clare) here to announce the winners of our Halloween challenge. 

first place 


second place


third place


Congratulations Ladies!!

As some of you may know challenge no 97 will be our last challenge but don't be sad, we have some very exciting plans coming soon, so watch this space!

You can check out Sarah's post here for our latest news.

Clare x

Monday, 27 October 2014

Halloween's a comin'........


Hello, Claire N, back with you today to show you a little more detail on my Halloween challenge make this month.
I only have one of Sarah's Doodle Dolls, but the beauty of their design is that you can adaot them to whatever scene suits just by colouring. So our 'Dream a little Dream Doll' has donned a Halloween outfit. There is lots of texture going on with this plaque, so I'll show you how I achieved it.


I have used a texture (grunge) paste through Sarah's hexagonal stencil, and also created a sense of perspective by stamping a fence (from Sarahs Spook Street stamp range) through the middle of the scene. the areas where I didn't use the stencil I purposefully left the paste uneven (above the fence) to create an illusion of clouds.


While the texture paste was drying I stamped the body of the Doodle Doll onto a self adhesive canvas panel, and coloured in ith the pumpkin promarker (LOL!....apt don't you think!). I left the bottom of the dress unstamped and unfinished because when I fussy cut the dress I wanted to pull the fibres at the bottom to create a ragged effect.


With the paste dry, I primed the plaque with gesso (mixed black & white to make the stormy grey colour), going heavy in some areas to create a stormy sky.


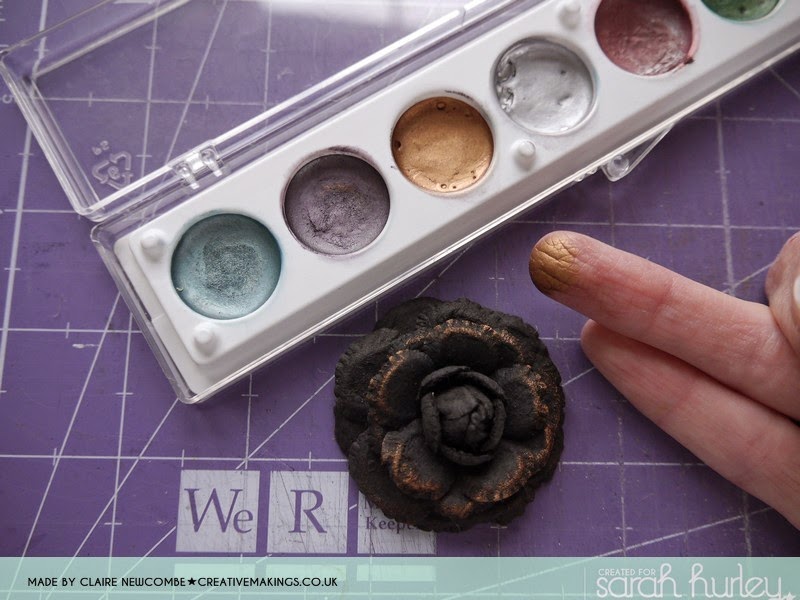
Again, after a period of drying I painted/tinted the panel as a whole with spray inks and a brush. I didn't want a full on colour, just more of a tint really and these sprays worked well for that. To add highlight and sheen to certain areas (particularly those parts that are raised) I used rub on tarnishing creams in various colours.


Also, when adding the finished touches I applied some of the bronze coloured cream to a paper flower. By doing this the starkness of the black is softened and makes it ( the embellishment) look much more in keeping.


But matting and laering onto complimentary card stock, and adding rustic embellishments I was able this piece of Halloween art.


I am by no means an experts in this type of crafting, so I hope I have de mystified this type of mixed media technique. I still have much more to learn and practice, and I shall have fun doing so along the way. IfI  have inspired you to have a go, we as a DT would love to see your creations.

Don't forget to call back again, we as a Team have regular projects and tips to share with you.


Saturday, 25 October 2014

Garden Fairy

Hello everyone! It's Ria here today.

I'm sharing a fun card using the Special Edition Stamps -Garden Fairy by the  uber talented Clare Brown. I was able to use most of the elements in the set and glad to see how it works well to create a happy and bright card.

For the main image, I stamped the cute fairy in white cardstock and colored it with promarker. After coloring, I added a Wink of Stella Clear glitter pen to give some shine without overdoing it.

Noticed the bright papers? I got them from the Tropical Favourites kit, love the cheerful colors of the kit :)

I stamped the banners in different inks and fussy cut them. I added them on top of the card panel for some additional dimension and texture too, don't you love the different patterns of these banners?

I think the stamp set will be great also for a fairy theme birthday invitation, an accent for a tag or as the stamp of choice for girl's scrapbook page.

So here it is, a look at the full card


And the details


That's it for today and we'll catch up again soon!

Thursday, 23 October 2014

Halloween is nearly here.


It's coming........that spooky, fun, let yourself go time of year!  Like most people, I love it. It seems like the whole of the DT have gone Halloween crazy and I don't blame them!


This is my Halloween journal page for the challenge which you can find here. 
I thought I'd have some fun with the Doodle Home stamp set. I had forgotten how cool this set is and makes a great addition to a journal page.


I just stamped them out a few times, cut them out and used a soft black pencil to go around the edges. My background is a bit of good old finger painting with acrylics in purple and white.


I finished it off with the quote and a few spooky additions.

Have fun this Halloween.

Jaine x

Tuesday, 21 October 2014

Batty About You!

Hi, it's Carol here and today I am going to share a card I made using Sarah's Silhouette FilesSarah's Stamps and lots of other crafty goodies.

1  I picked the Silhouette file I wanted, then the colour of card I wanted to use, I picked the awesome Bat Card Frame. I also "released the compound path" of the file so I could cut out the oval shape in plain white card. I also placed a couple of Bat Silhouettes on the top and bottom of the oval, you will see what I did with them next.


2 I placed the bat frame onto a piece of red mirri card and layered it up, with black card too.


3  I took the Oval and the bat cut outs and distressed them using Black Soot Distress Ink. You will see the finished result on the card.


4  Once I distressed the oval, I stamped "Batty About You" using Sarah's Block Alpha Stamps and Lady Bug Memento ink, I used the Outline Alpha Stamps in Tuxedo Black to give some contrast.

5 I put the card together and popped a bit of 1mm foam under the body of the bats to make them look like they are about to fly off. 


I really hope you like the card, and it shows that Halloween themed pretties can be used all year round.

Thanks for popping by, remember there is still time to join in our Halloween Challenge.

Bye for now,
Carol x


Monday, 20 October 2014

Trick or Treat

Morning all.

I’m not usually a big fan of Halloween, but since having children we do celebrate it a little more. So I made this banner to hang up:

The pennants were cut by hand and embellished with papers and images from Sarah’s Spook Street Digi Kit.

Supplies:

  • Kraft, Green, Purple & White Card
  • Archival ‘Jet Black’ Inkpad
  • Derwent Pencils
  • White and Black Fine Line Pens
  • Glitter Glue

Thanks for stopping by

Lisa

Friday, 17 October 2014

Boo!!

Hi all,

It is Nicole here with a fun Halloween tag project. I used the fun Spook Street kit for some embellishments and the fabulous crackle background stamp on this one.

I die cut a black and a purple tag. I had some orange card left over so tore up a strip of that also.

I stamped the crackle background on the purple tag.

I then layered all the cut out embellishments on the tag, using a combo of glue and foam tape. 

I then laid the orange strip over the bottom of all this.

I added a fun little panel for the sentiment...

I stuck a cobweb up in the top corner and trimmed off the excess.


I added a long orange ribbon and left it at that. This will be fun tied onto a little trick or treat bag, or even as some decor.
Thanks for stopping by today, hope you got some Halloween inspiration!

Wednesday, 15 October 2014

DOCUMENTED 365 - DOODLING

Hi and welcome to the Sarah Hurley 365 blog.

Once again it's my (Clare) turn to inspire you and today I thought I'd share week 5 of my Project Life/Documented 365.

It's without a doubt this 'A Few Of My Favourite Thing' kit is my all time favourite. I love everything about it, from the colour combinations to the quirky doodle paper and stamps. It just screams fun!

Here's my two pages in full but I have also taken some pictures of the individual journal cards to give you an insight into how they were created.

Every page always has a week journal card and it's normally the first place I like to start.


And now the second page


I love incorporating all the little stamps you get in Sarah's stamp sets, the possibilities are endless.


Here I have used texts from 'Today' stamp set


The background was created using the background stamp from Doodle Doll - Princess Girl. The sentiments are from the Everyday Sayings stamp set.


The little cute bird is also from the kit and the speech bubble is from the 'Snip n Cut embellishment set.


That's all from me today and hope you have a lovely crafty day!

Clare x

Monday, 13 October 2014

Scrappy Fun

Hi all,

Nicole here today to share a little step by step with you all. You may have seen my tag over on the challenge post a few weeks ago? I created a tag shaped door hanger for Halloween decor. Today I want to share the way I created the background.

I started off by paper piecing the image together. I coloured the flesh in a pink and green tone and added in the hair and dress.


I then gathered up a lot of my Halloween paper scraps and tore them into strips...

I then glued these all onto a piece of black card stock...

I then die cut a tag from this page using a Tim Holtz tag die...

I added a fun message from the stamp set...mmmm....brains!

I added my zombie girl and used a combination of glue and foam pads to mount it...


And here it is complete again. I don't know what happened to the colours on this final photo unfortunately but you get the idea!!

Friday, 10 October 2014

It's a Strange time of year.

Hello, Carol here today and I thought I would share a Halloween card I made a wee while ago using the fabulous Angelica Strange Stamps and papers from one of my favourite digi kits 31 Spook Street.

1 - Stamp Angelica onto white card.
2 - Stamp two skulls, one onto the sticky bit of a post it note as you will need that as a mask for the bones and one onto Angelica's dress.
3 - Place the mask over the skull you stamped onto Angelica's dress and stamp two bones like in the picture.
4 - Colour her in with your favourite pens or pencils. I used Promarkers and Flexmarkers.
5 - Fussy cut her out.
6 - Punch out lots of different bits of Halloweeny papers from the 31 Spook Street Digi Kit and go around the edge with a black marker or ink pad. This is a great way to use up scraps of paper.
7 - Layer them onto the page.
8 - Pop Angelica onto some 3d foam and place her on top of the punchie shapes.
9 - Use the Spooktacular sentiment from the stamps to finish the card.


Ingredients
Promarkers and Flexmarkers

Thanks for popping by today, we would love it if you could join in our challenge this month, the theme is Halloween.