Showing posts with label Doodle Doll Stamps. Show all posts

Wednesday, 1 April 2015

"Be Amazing" 10 minute make.

Hello, it's Carol here today and no it's not an April Fool lol.  Today I am sharing one of my "10 Minute Make" Cards made using just two stamp sets and some Distress Inks.

I love Sarah's Doodle Doll Stamps and how well they all work together, I used the arty extras from the Art Girl Stamps and the sentiment from Be Amazing Girl Stamps. It actually took me longer to decide which colours of ink to use, but that isn't unusual for me lol.


I cut a piece of white stamping card to size and got all my pretties ready to get creative.


I stamped a line out with the circles from the stamp set, then got the splash and brushstroke stamp and stamped them out in different colours. I just love the new Limited Edition Distress Inks, don't you? I stamped on the "Be Amazing" Sentiment in Tuxedo Black Memento Ink as a contrast to the pastel colours.


I used some double sided tape to stick it down to some lemon coloured paper and used my Perfect Layers ruler to make a wee border round the card. I then popped that onto my card blank.


Ingredients
DST from Stix2
Distress Inks

I hope this shows that "10 Minute Makes" can be inky and fun! Thanks for stopping by today, remember to visit again soon to see what the other #TeamHurley girls are up to.

Carol xx

Saturday, 10 January 2015

Dream A Little Dream

I hope you are all well and haven't been blown away in this wild weather! Today, it is my (Susie) turn to show you a little something and I decided that I fancied stamping one of the lovely Doodle Dolls. This one is called Dream a Little Dream and is lovely and easy to colour. I stamped her onto Kraft card (aka the inside of my Christmas wrapping paper!) and coloured her with my Polychromo pencils. After shading and colouring her face, I stamped her beautiful big eyes and added a little more shading for her nose and her eyebrows. After that, I decided I would give her a little smile.....must have been feeling brave, huh?!

As is pretty normal for me, I kept the layout really simple to show off the gorgeous teal/turquoise paper and image. (Have I ever told you that my favourite colour is teal/turquoise?!!). The papers, heart and turquoise gems are from various A Few of My Favourite Things kits. I decided to add a little doodling and Stardust Stickles to finish off my card.

And here is a wee close up of Doodle Doll Dream a Little Dream Girl:


Sunday, 16 November 2014

Happy Sunday everyone! It's Ria here today.

Christmas is just few weeks away and I have started creating my holiday cards to be sent out to family and friends.
I'm looking at my stash and I was thinking of using the stamps and papers that I already own to use in my Christmas cards. There will be other ways that you can use stamps other than what they are by changing the colors and adding other elements in the project.

Here I used the Doodle Doll Wish Upon a Star stamp set and colored her with Christmas colors, red and green. The other elements you see such as the stars and flag banner are from non-traditional paper packs that I already have from Sarah.

I used a die cut snowflakes to cut the papers also from Sarah and added some texture in my card base by using an embossing folder.

I wanted to mimic an angel for this doll so I also embossed an vellum that served as her wings.

This is a quick holiday card and I think the same can be also replicated in a Project life page isn't it?

Here's the full card..


A closer look at the details..


Until next time!

Supplies used:

Doodle Doll Wish Upon a Star Girl stamp set
A Few of my Favourite Things March kit
A Few of my Favourite Things April Happy kit
Embossing folders, dies, washi tape, vellum

Monday, 27 October 2014

Halloween's a comin'........


Hello, Claire N, back with you today to show you a little more detail on my Halloween challenge make this month.
I only have one of Sarah's Doodle Dolls, but the beauty of their design is that you can adaot them to whatever scene suits just by colouring. So our 'Dream a little Dream Doll' has donned a Halloween outfit. There is lots of texture going on with this plaque, so I'll show you how I achieved it.


I have used a texture (grunge) paste through Sarah's hexagonal stencil, and also created a sense of perspective by stamping a fence (from Sarahs Spook Street stamp range) through the middle of the scene. the areas where I didn't use the stencil I purposefully left the paste uneven (above the fence) to create an illusion of clouds.


While the texture paste was drying I stamped the body of the Doodle Doll onto a self adhesive canvas panel, and coloured in ith the pumpkin promarker (LOL!....apt don't you think!). I left the bottom of the dress unstamped and unfinished because when I fussy cut the dress I wanted to pull the fibres at the bottom to create a ragged effect.


With the paste dry, I primed the plaque with gesso (mixed black & white to make the stormy grey colour), going heavy in some areas to create a stormy sky.


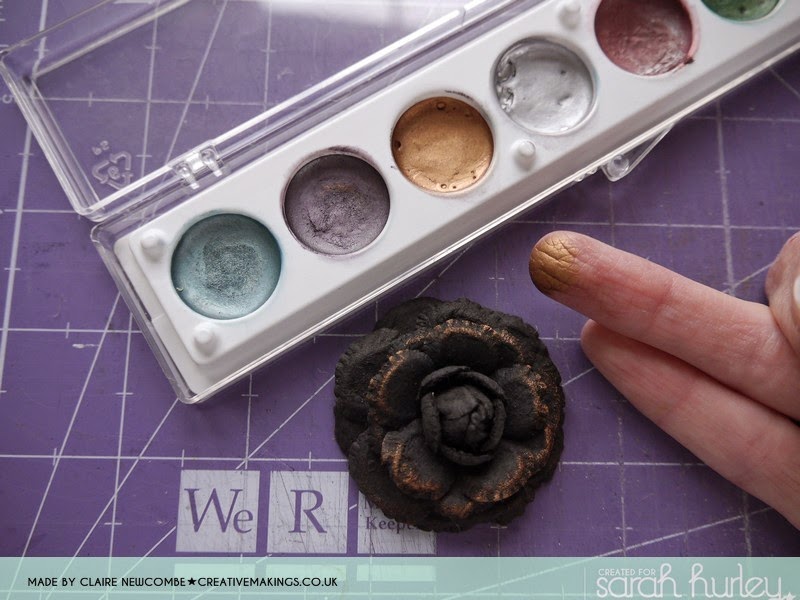
Again, after a period of drying I painted/tinted the panel as a whole with spray inks and a brush. I didn't want a full on colour, just more of a tint really and these sprays worked well for that. To add highlight and sheen to certain areas (particularly those parts that are raised) I used rub on tarnishing creams in various colours.


Also, when adding the finished touches I applied some of the bronze coloured cream to a paper flower. By doing this the starkness of the black is softened and makes it ( the embellishment) look much more in keeping.


But matting and laering onto complimentary card stock, and adding rustic embellishments I was able this piece of Halloween art.


I am by no means an experts in this type of crafting, so I hope I have de mystified this type of mixed media technique. I still have much more to learn and practice, and I shall have fun doing so along the way. IfI  have inspired you to have a go, we as a DT would love to see your creations.

Don't forget to call back again, we as a Team have regular projects and tips to share with you.


Tuesday, 7 October 2014

Recycled, Free Standing Kraft Project

Hi there, Claire N with you again, and today I wanted to re-visit a project I created for the latest edition (volume 5) of Sarah's Lookbook.

I'm not quite sure what to call it, I guess it's a 4 panel concertina, interactive frame (bit of a mouthful LOL). 


What I wanted to do was to let you about where the idea came from originally, and then chat a little bit about some of the details. A project like this can sometimes look quite daunting to someone new to crafting, but really it isn't!


The whole project came about, because we had some free standing radiators delivered with lots and lots of protective packaging.....and being a crafter (as my husband was checking the radiators for damage) my mind began turning over when I found these fascinating pieces of cardboard, in perfect condition, that folded into nice neat little books. What you can't see in these photo's is the huge pile of them that I now have sitting in my craft room....hehe!


So, for those who would find this type of altered project daunting, the trick is to consider this a four separate projects...ie a piece of artwork for each panel. This is where I started, and you can see I have prepared the 4 backing paper panels. I have chosen to keep a unified theme across the panels, but of course anything goes and you can choose your own theme.


Here are the papers, stamps and extras I am using throughout, this is one of my favourite collections from Sarah's AFOMFT kits. Having settled on and created the layered backgrounds, I moved on to creating the set of dolls (Doodle Dolls, Dream a Little Dream stamp set), that can be swapped, according to your mood.


Stamp your dolls onto your favourite colouring card (later you will colour the faces, I used promarkers), and cut out. Next stamp the dolls onto the papers of your choice then cut out the hair and dresses separately, and re-dress (techniques known as paper piecing) the dolls. I used a wet glue (sparingly) to piece the dolls back together.


I made coordinating dolls, and used a polka dot kraft paper pocket as a storage pocket on the fourth panel (to house the extras). As I mentioned this is an interactive piece of art work, and on the second & third panels I have glued a usable mini clothes peg (once i had finished my decorative layers on the panels). The concept of being able to swap the dolls, from the extras stored, came about because I couldn't decide which of the dolls I liked best, so this way I could include them all.


The last detail I wanted to share with you, is how I made the bunting. Bunting is very popular in paper crafting at the moment, and it comes in all shapes and sizes. On the Doodle Dolls Stamp set there is one little triangular stamp (you can see mounted below) and for the beginner, it may not be instantly clear what it can be used it for. 


Hopefully from the photo below you can see, that when stamped again and again, then carefully cut out, you have the makings of a pretty banner.


I chose to keep my banner black and white and used silicone glue to string them to a length of bakers twine. I then punched holes, and reinforced them with eyelets before knotting the bakers twine through it.


Thank you for bearing with me, and I hope I have taken away some of the mystery when tackling a project of this kind.

Looking forward to you visiting us again, when there will be another inspirational post from another of my team members.


Saturday, 3 May 2014

Something a bit fishy.


Sometimes I just want to play and see where it takes me and this page in my journal was one of those occasions.


I started with a couple of Sarah's stencils and some ink just to lay down a background. I used the hexagon background stamp and red Versafine to add a bit of stamping and dribbled some more ink from the top.


I already had the idea to use the Doodle Doll as a mermaid, stamping the parts individually onto scraps of coloured paper and the punched circles added to the magical scene.


 So what could be more appropriate to go with her than my own fishy stamp set  "Don't Be Crabby" from the Special Editions range also stamped onto paper scraps.

 See you soon,

Jaine x

Sunday, 20 April 2014

Art Journaling with the Doodle Dolls

Hello Claireliz here.

Happy Easter, I wish you many chocolate eggs!

I've been having a play in my art journal with Sarah's Doodle Doll stamps, One of the sayings from Sarah's Princess Doodle Doll stamp set has kind of stuck with me...

"Always wear your invisible crown"

Personally I think that is a great bit of advice, no matter where you are or what you are doing, always wear your invisible crown, this was my starting point for this journal page....


I sprayed the background with aqua spray ink, whilst that was drying I stamped the six Doodle Dolls - Be Amazing, Princess, Wish Upon A Star, Dream a Little Dream, Art Girl and last but not least Zombie Girl (because we all have days when we don't feel our best), Whilst the ink was drying on the dolls I returned to the journal page, I used Sarah's Chevron Stencil & some Faded Jeans Distress Ink to create the chevrons in opposite corners, then I stamped around the edges of the page using the stamps from the Doodle Doll sets & different coloured inks. 
I coloured all of the Doodle Dolls with Promakers, glued them to the page & drew around them with a black pen. 
I stamped the phrase "Always wear your invisible crown" using Sarah's Alpha Block stamp set & I stamped the word "invisible" in blue to make it a bit more invisible.

I wanted to give each Doodle Doll an invisible crown so I used the crown stamp from the Princess Doodle Doll stamp & stamped it onto each Doodle Dolls head, then instead of colouring them in I used clear Stickles to create the look of an invisible crown...


Finally I used some hot pink polka dot paper from one of Sarah's AFOMFT kits, I stamped stars onto the paper, cut them out & attached them to the page.


That's all from me for today, I hope you all have a lovely time & enjoy the chocolate, don't forget to always wear your invisible crown.

Take care & hope to see you soon.

C xx